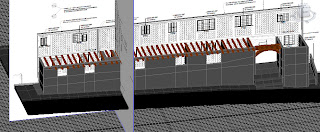
The Guildhall has many beams running throughout the building. In order to create these I simply used the box shape. To get the right shape and size I used the scale tool, and then it was just a case of following the outline shown in the reference planes. Once in the right place, I held shift and dragged another beam out, moving that one into the correct position. I continued this cloning process until all of the beams were in place.
However, the problem with the Guildhall is that it slopes - the back of the building is not the same height as the front. In order to solve this problem I had to convert all of the beams to editable polys and use the rear reference plane to adjust the height of the beams there, so that they were in the right position on both sides of the building.
Once finished, I added the main central beam, using a similar process. In order to create the wooden arch at the front I used a cylinder shape, converting to an editable poly and deleting one side in order to leave a half-cylinder. I had to use the bridging process in order to create new faces where the bottom half had been removed. Then it was a case of dragging the vertices until it form the correct arch-shape I was looking for.
No comments:
Post a Comment