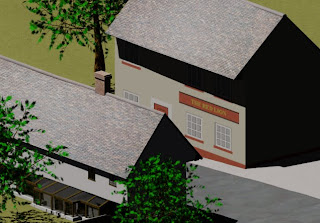
Some scenes in 3D Studio Max require many different materials to be used. Also, sometimes you need to apply different materials to different areas of an object. This is the technique that I learnt to overcome these problems.
In 3DS Max there are only 12 material slots by default. This can be increased to 24 by right-clicking on a material slot and selecting the 6x4 Sample Windows option. But if you need more than 24 slots, or you need to apply different materials to different areas of an object you can use something called Multi/Sub-Object materials.
By selecting the Multi/Sub-Object in the Material/Map browser, you then get the option to keep the material in that slot as a sub-material or to discard it. If the slot is empty to start with, it doesn't matter which option you choose. You then get a list of 10 material slots under a menu titled Multi/Sub-Object Basic Parameters. This can be extended as required. Each slot has it's own ID number and there is also a box where you can give the material a name.
In each of these slots you can create materials as you would in the normal material editor by simply clicking on the buttons labelled "Material # (Standard)" in the Sub-Material column. Alternatively, if you already have a material that you need to make into a sub-material then you can drag and drop it from the browser onto this button.
Once you have a few sub-materials defined you can the apply the multi material as you would any other material by dragging and dropping onto the relevant object. The object needs to be converted into an editable poly (if it is not already one). Once the material has been applied you need to go into sub-object mode and select the faces option. This is where you define which of the sub-materials to apply.
The best way to start is to define the main material you will use. For example, when making the Guildhall, the bottom of the outer walls consists of brickwork, whilst the rest of the wall is white masonry. Therefore it makes sense to apply the white masonry material to the whole wall first and then go back to define where the brickwork needs to be. You can do this by selecting all of the faces in the wall. Then, in the sub-object menu on the right hand side you can navigate down to a section called "Polygon: Material IDs". Now, in the Set ID box you simply need to enter the ID number of the relevant sub-object material. For example, if white masonry was in slot number 1 of the multi material, then we'd enter 1 in the Set ID box.
Now it is simply a case of selecting the faces that you wish to apply a different material to. In the Guildhall project, this was the bottom row of faces on the outer wall. You then follow the same method, entering the relevant ID number in the Set ID box. This technique allows you to apply as many different materials to one object as you wish. Also, if all of the 24 material slots in 3DS Max were used as Multi/Sub-Object materials, then it would allow you to have 240 different materials before you needed to add any more ID slots.
In the Guildhall project, I used this technique in a few different areas. As mentioned, the key area was the bottom row of bricks on the actual Guildhall itself. Also, when creating a basic model of the pub across the road and the houses next to the Guildhall, this technique came in very useful. I created basic textures in Adobe Photoshop CS5 for the fronts of these buildings. The, I created a box-shaped object with two height segments. I applied the bitmap material of the front of the building using a UVW-mapping modifier, and then I could match the colours all the way around the building by applying different colour materials to the different height segments.
No comments:
Post a Comment